
Below are the must have requirements for it to work smoothly.
- Windows 10 / Windows 11 or Windows 8.1 operating system. Windows 7/xp/vista and older versions are not supported.
- One or more supported Gamepads / Controllers (Check Supported Gamepads List)
- Bluetooth USB Dongle to connect the controllers / gamepads wirelessly (optional only).
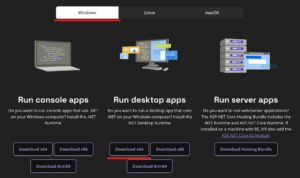
- Download and Install .Net 6.0 Runtime (x64 Bit) on your Windows 10/11/8.1/ pc (or) desktop.
Press and hold PS + Share buttons on your DualShock 4 (DS4) until the lightbar starts blinking like in the below image.
Press and hold PS + Share buttons on your DualSense / DualShock 5 (DS5) until the lightbar starts blinking like in the below image.
Press and Hold the PS button on DualShock 3 (DS3) Controller for 1 to 3 seconds until you see the red light starts flashing.

Press and Hold the Sync button until you see the controller LEDs start blinking back and forth as shown in the below image.
If you have an exact replica of the original DualShock or Dualsense controller, you can follow the same exact steps to pair the device with your windows pc.

It’s highly important to be cautious when using it for the first time. Make sure to install required drivers first hand and connect the controller to pc on the other hand. Then, follow the below instructions (only if needed).
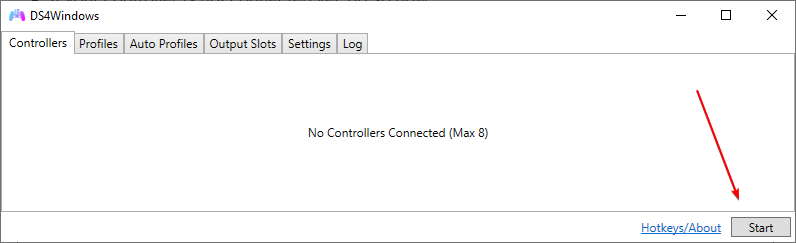
- Hit “Start” button to enable the DS4W if it’s not yet started by default.
- When you connect your real controller to your pc through bluetooth / usb connection, there are chances that your pc detects it.
- If you have installed hidhide driver, you don’t need to worry about it. But, it’s important to cross check the things to avoid double controller input issues.
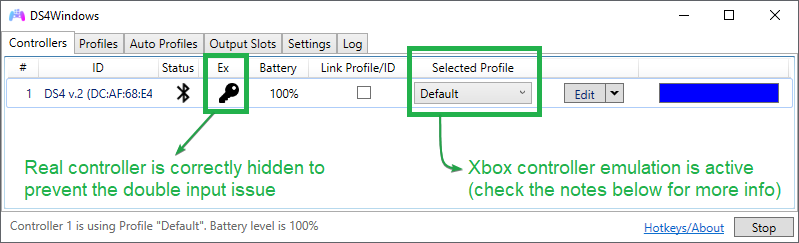
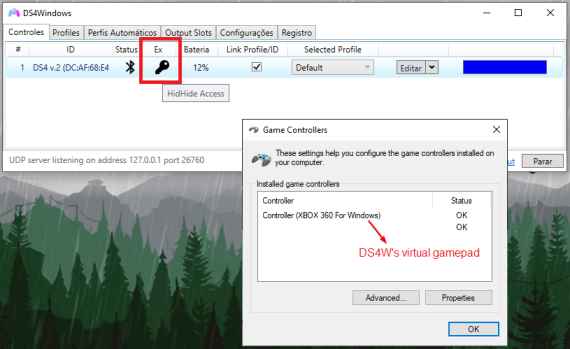
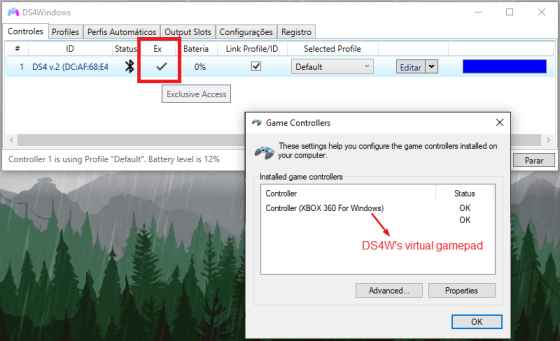
- If you can see the “Key” icon as indicated in the above image, the real controller is hiden successfully.
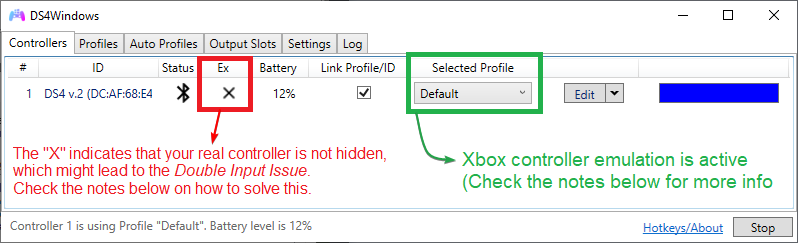
- If you see the “X” mark, it means that your real controller is not hidden. Do not worry about it, you can actually fix it and go ahead. In case if you are facing any other issue, refer the Guide To Fix DS4Windows Not Working Guide.
You can see “Default” under the “Selected Profile” menu. Which means that the xbox virtual controller emulation is active. For more information, read the important information available below.
Double Input issue arise when a game detects your real controller and the virtual xbox controller at the same time. In general, the DS4W tool will make your pc and games think that there is only one controller that is xbox 360 controller. That is better controlled by the Hidhide driver but some games will detect both the real controller and the virtual controller.
That leads to a lot of confusions in terms of in-game commands with your controller. You can see how any pc game detects both the controllers as shown in the below image.
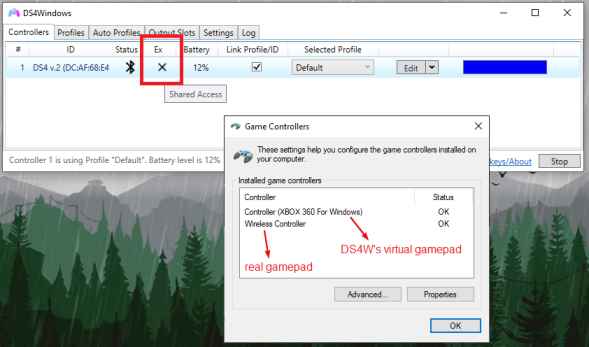
You can clearly see in the above image that the “X” mark is displayed right besides the bluetooth icon. It means that your real controller is not hidden. So that, it will be a cakewalk for the games to detect both the controllers as shown in the second part of the above image.
Whenever this conflict arise, the games and apps on your pc will receive inputs from both the controllers (real & virtual). Which will cause a lot of input issues and you won’t be able to play games in a way that you wanted.
- Game will detect the same command twice everytime making it difficult to play.
- Activates 2 player mode / multi player mode automatically.
- Virtual controller commands will be ignored because the game has detected the real controller at first.
- Controller’s inputs will be treated incorrectly. It happens because the game detects commandss from both the controllers and unable to decide which controller’s inputs to be considered.
- Games cannot detect any input commands from the virtual controller because the games detect the real controller in the beginning.
As you may see in the below image, there will be double command inputs from both the virtual and real controllers. On the other hand, there is no guarantee that both the controllers will provide the same input.
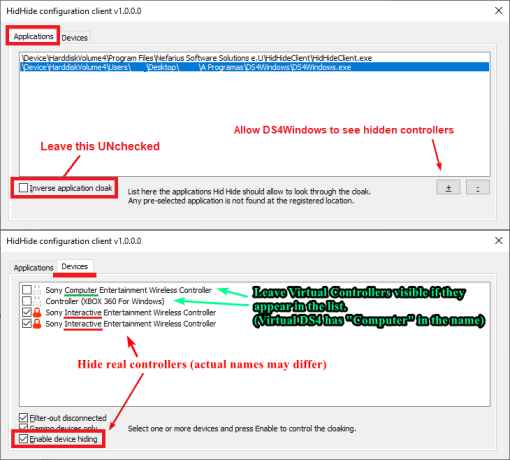
You will be able to see this option under the Settings of the DS4Win tool. When you enable this option, the tool will ask the windows os on your pc for the access to the detected controllers. That will help the tool to detect all the connected controllers/gamepads thus avoiding the double input issues.
Windows may deny the permission access to the connected controllers due to the following reasons.
- A gamepad might be already running.
- Any web browser is running (for example: Google Chrome, Opera or Microsoft Edge, etc).
- If there is any issue with the NVidia Graphic cards on your pc.
- If there is any issues with the connection of the controller to the pc (USB or Bluetooth).
In case if windows allows exclusive access to the connected gamepads, the connection may be dropped if a controller is disconnected while playing a game for whatever reasons. So, if you want to get access to it again, close the game and reconnect the gamepad to the pc and launch the game again.
This is somewhat a hectic process and the gamers need to close the game always when they face any such an issue. That’s the reason why the option “Hide DS4 Controllers” option is not recommended and completely optional to the users. In fact, you do not need this option becuase you can go ahead with the HidHide driver.


- Hit Windows Key + R and type %appdata% in the Run Command window and hit enter.
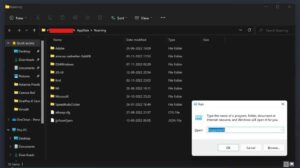
- Now you can see that a folder opens up on your pc. The path of the opened folder is appdata/roaming.
- You can see various folders right there. If you can see the DS4Windows folder, select it and delete it from there.
- Go to start menu of your windows pc and click the “Settings” icon to launch the settings.
- Select “Apps” section on the left hand side menu.
- Tap “Apps & Features” option on the right hand side.
- Type “HidHide” in the search bar and hit enter.
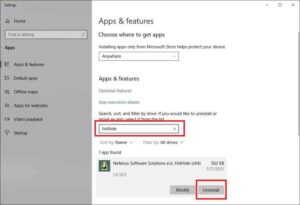
- Now, hit “Uninstall” button as shown in the above image and you are done.
- Restart your windows pc to apply the changes that you have made.
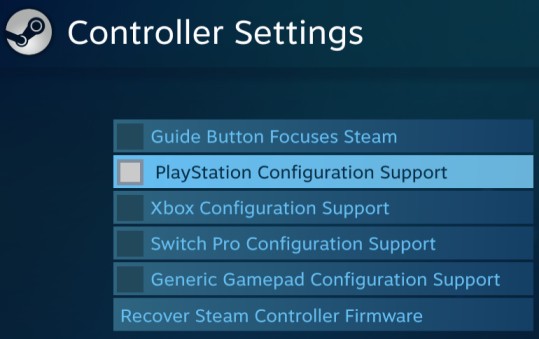
- Launch Steam, open Settings and then go to the Controller settings as shown in the below image.
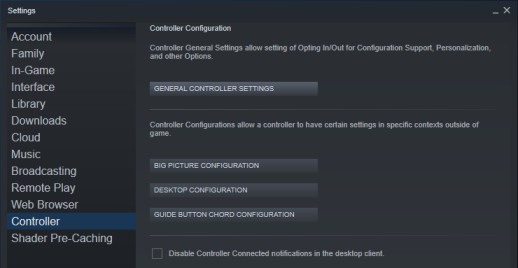
- Tap General Controller Settings option and disable Xbox configuration support option Playstation configuration support.
- Come back to the settings page of steam. Tap Guide Button Chord Configuration button. Unbind all the settings manually. The same process should be carried out two times (once when emulating xbox controller and another when ds4 controller emulation).

- Launch DS4Windows on your pc and then go to the Settings tab.
- Disable the option “Run At Startup” option if it is enabled by default.
- Go to the “Custom Exe Name” box at the right hand side.
- Enter the name that you want. In our example, we have entered DS4Win.
- Now, hit “Stop” button which is at the bottom right corner of the screen. Hit “Sart” again, close the software and re-launch the tool to apply the changes that you’ve made.

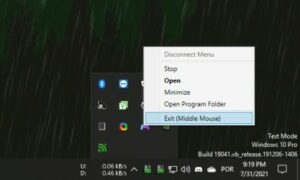
- Close the software completely (currently opened window, from system tray, etc.)
- Check out the below image to find if it’s still running in the background.
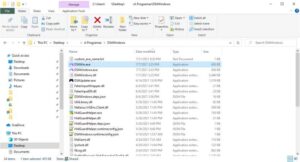
- Go to the folder of the software and see the new named file (DS4Win.exe in our case).
- We recommend you to run the software and see how things gonna work this time. Check below image for clear idea about what we are saying.
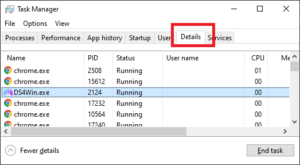
- Hit Ctrl + Shift + Esc key combination to open the Windows Task Manager.
- Go to the “Details” tab now.
- Make sure that the application with a new name (DS4Win.exe) is running instead of DS4Windows.exe.
- In your case, the name of the app that is running should be the name that you have renamed it with.
- Until you change back the current name to the actual name, you should go by the new name only.
- If the option “Run At Startup” is disabled in the beginning, then you should re-enable it now.
Important Note: This process works until you update the DS4Windows to any latest version. Once you update it, you should be doing the same thing again (setting up the custom .exe name).